To help you quickly and smoothly deploy this Demo to your own NocoBase environment, we provide two restoration methods. Please choose the most suitable one based on your user version and technical background.
Before starting, please ensure:
- You already have a basic NocoBase running environment. For main system installation, please refer to the more detailed official installation documentation.
- You have downloaded our CRM Demo files:
- Backup File (approx. 21.2MB): crm_demo_20250711.nbdata - For Method 1
- SQL File (approx. 9MB compressed): crm_demo_20250711_sql.zip - For Method 2
Important Note: This Demo is built on PostgreSQL database. Please ensure your environment uses PostgreSQL database.
Method 1: Restore Using Backup Manager (Recommended for Pro/Enterprise Users)
This method performs one-click restoration through NocoBase’s built-in “Backup Manager” (Pro/Enterprise Edition) plugin, with the simplest operation. However, it has certain requirements for environment and user version.
Key Features
- Advantages:
- Convenient Operation: Can be completed in the UI interface, capable of completely restoring all configurations including plugins.
- Complete Restoration: Can restore all system files, including template print files, uploaded files in table file fields, etc., ensuring Demo functionality integrity.
- Limitations:
- Pro/Enterprise Edition Only: “Backup Manager” is an enterprise-level plugin, only available to Pro/Enterprise users.
- Strict Environment Requirements: Requires your database environment (version, case sensitivity settings, etc.) to be highly compatible with our backup creation environment.
- Plugin Dependencies: If the Demo contains commercial plugins that you don’t have in your local environment, restoration will fail.
Operation Steps
Step 1: [Strongly Recommended] Start Application Using full Image
To avoid restoration failures due to missing database clients, we strongly recommend using the full version of the Docker image. It has all necessary supporting programs built-in, requiring no additional configuration. (Note: The image is built on 1.9.0-alpha.1, please pay attention to version compatibility)
Example command to pull the image:
docker pull nocobase/nocobase:1.9.0-alpha.3-full
Then use this image to start your NocoBase service.
Note: If you don’t use the
fullimage, you may need to manually install thepg_dumpdatabase client inside the container, which is cumbersome and unstable.
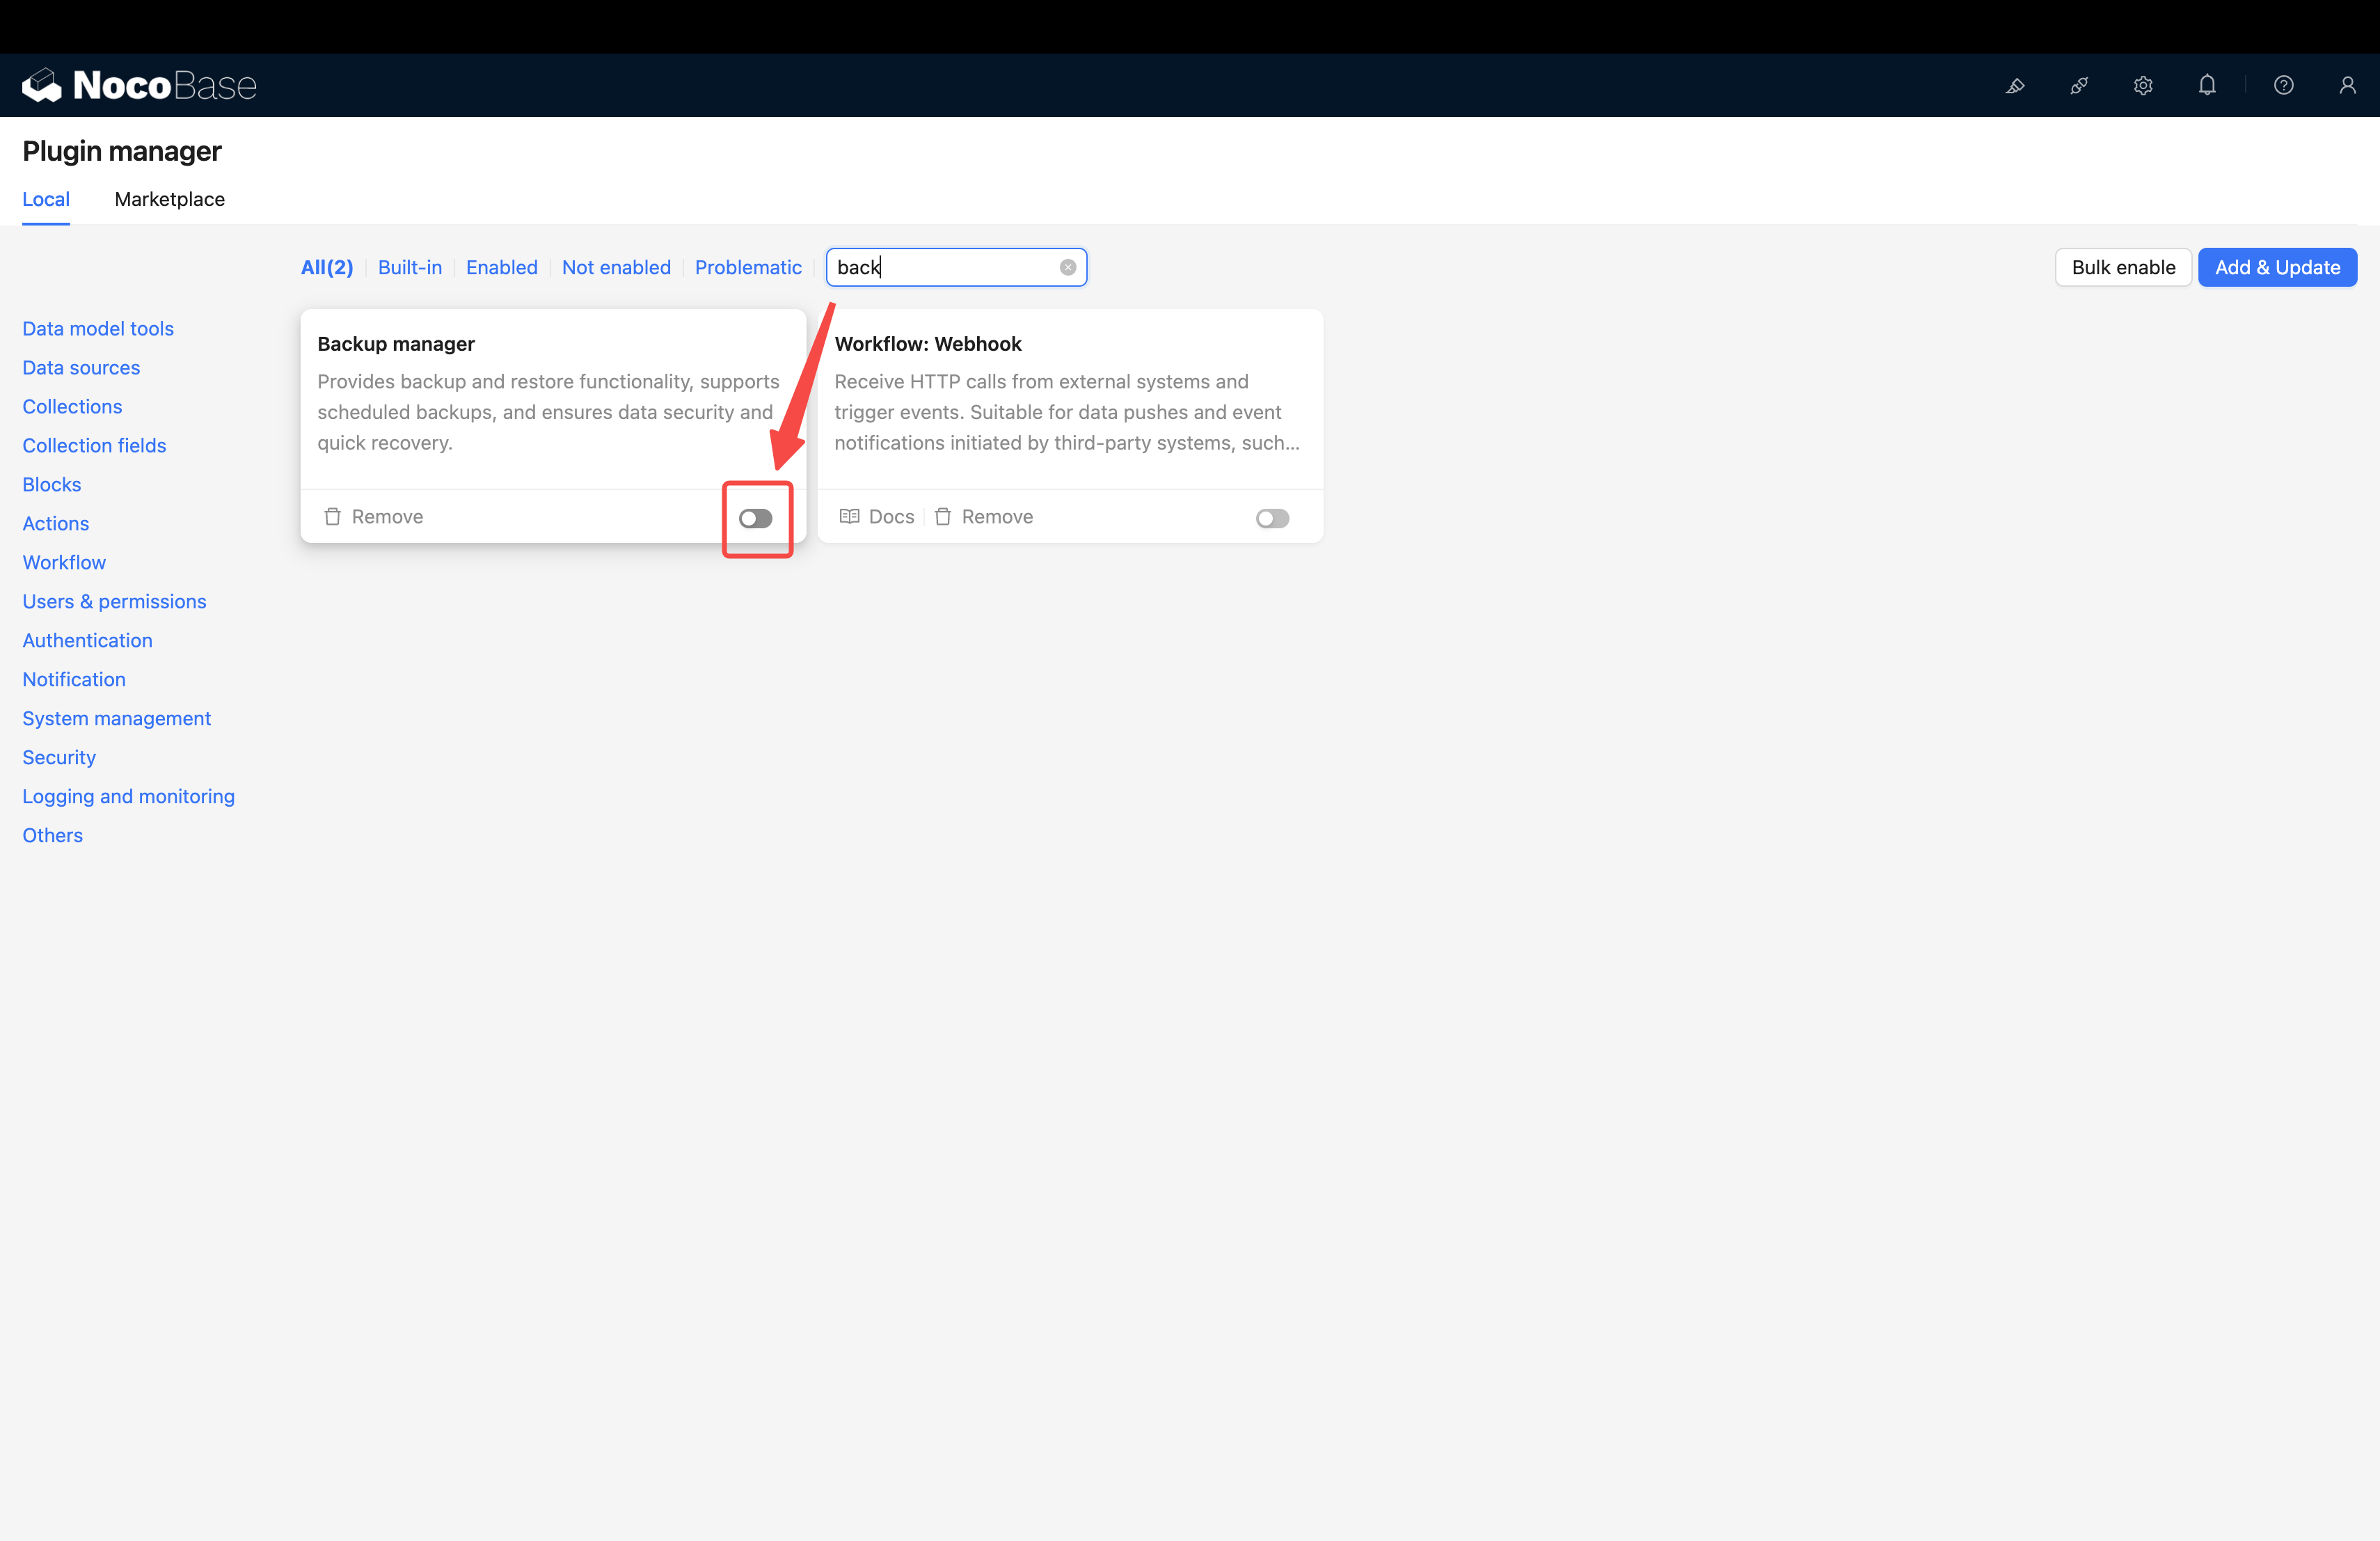
Step 2: Enable the “Backup Manager” Plugin
- Log into your NocoBase system.
- Go to
Plugin Management. - Find and enable the
Backup Managerplugin.

Step 3: Restore from Local Backup File
- After enabling the plugin, refresh the page.
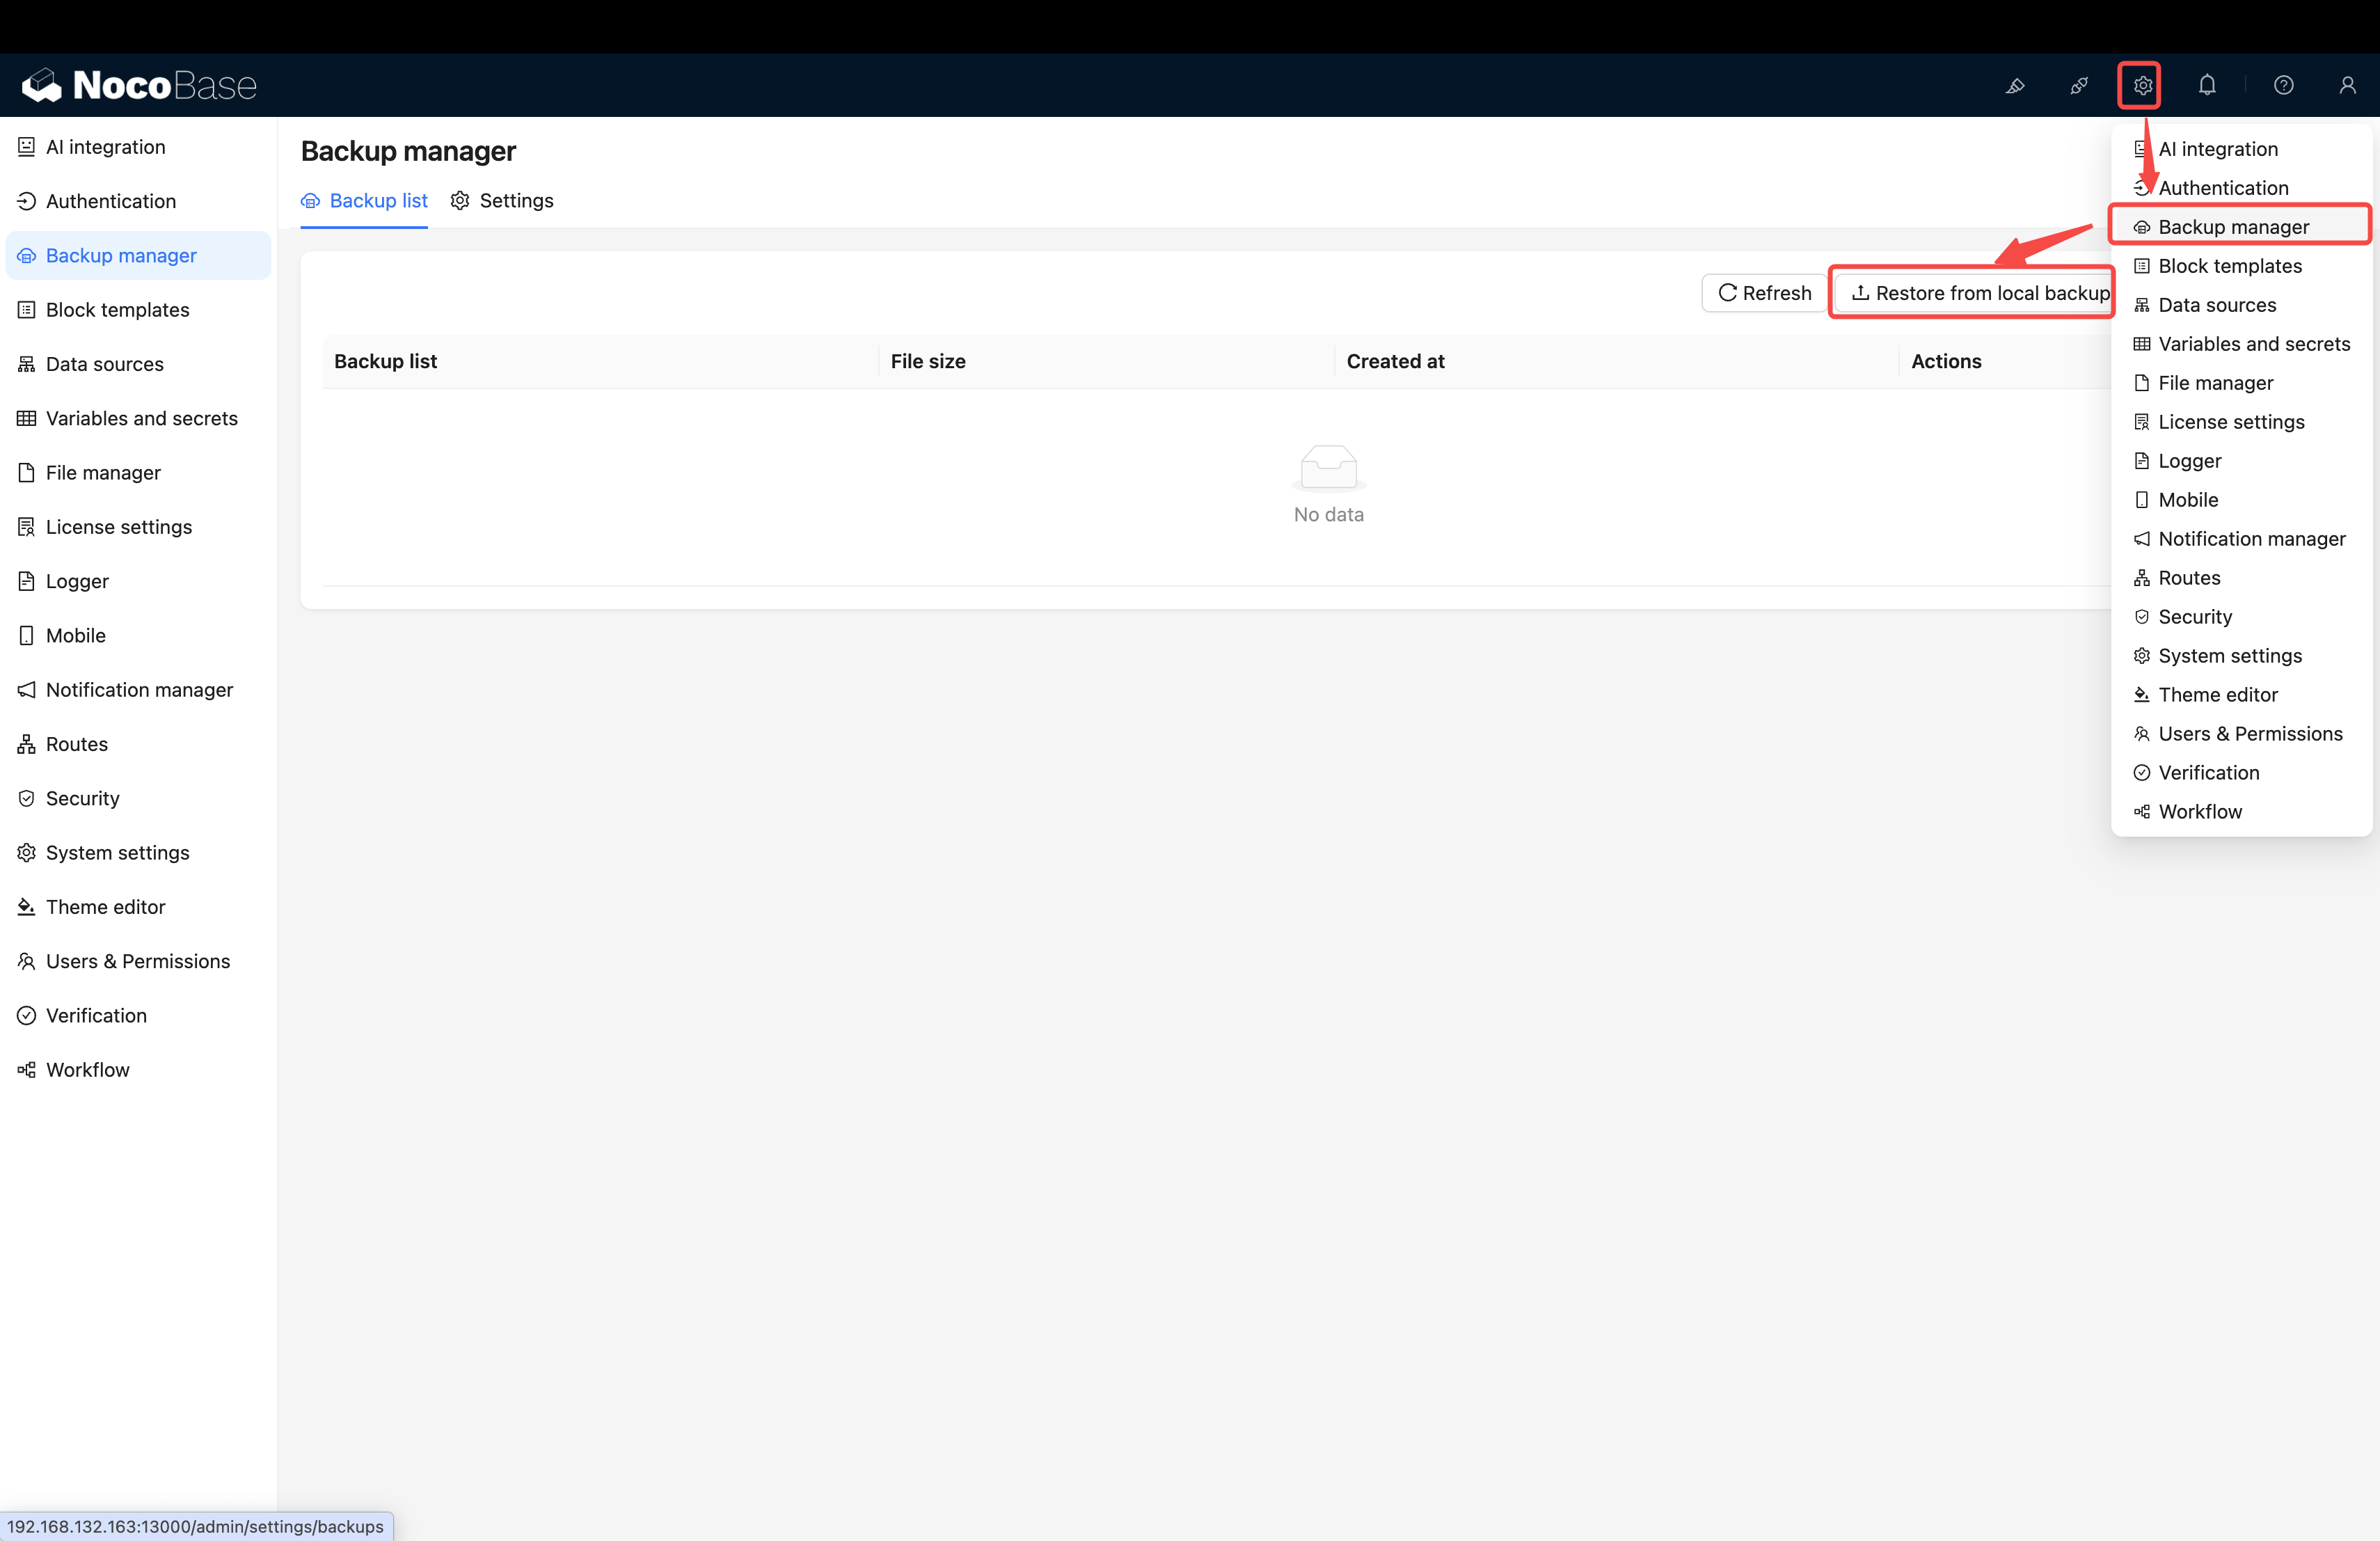
- Go to
System Management->Backup Managerin the left menu. - Click the
Restore from Local Backupbutton in the top right corner.
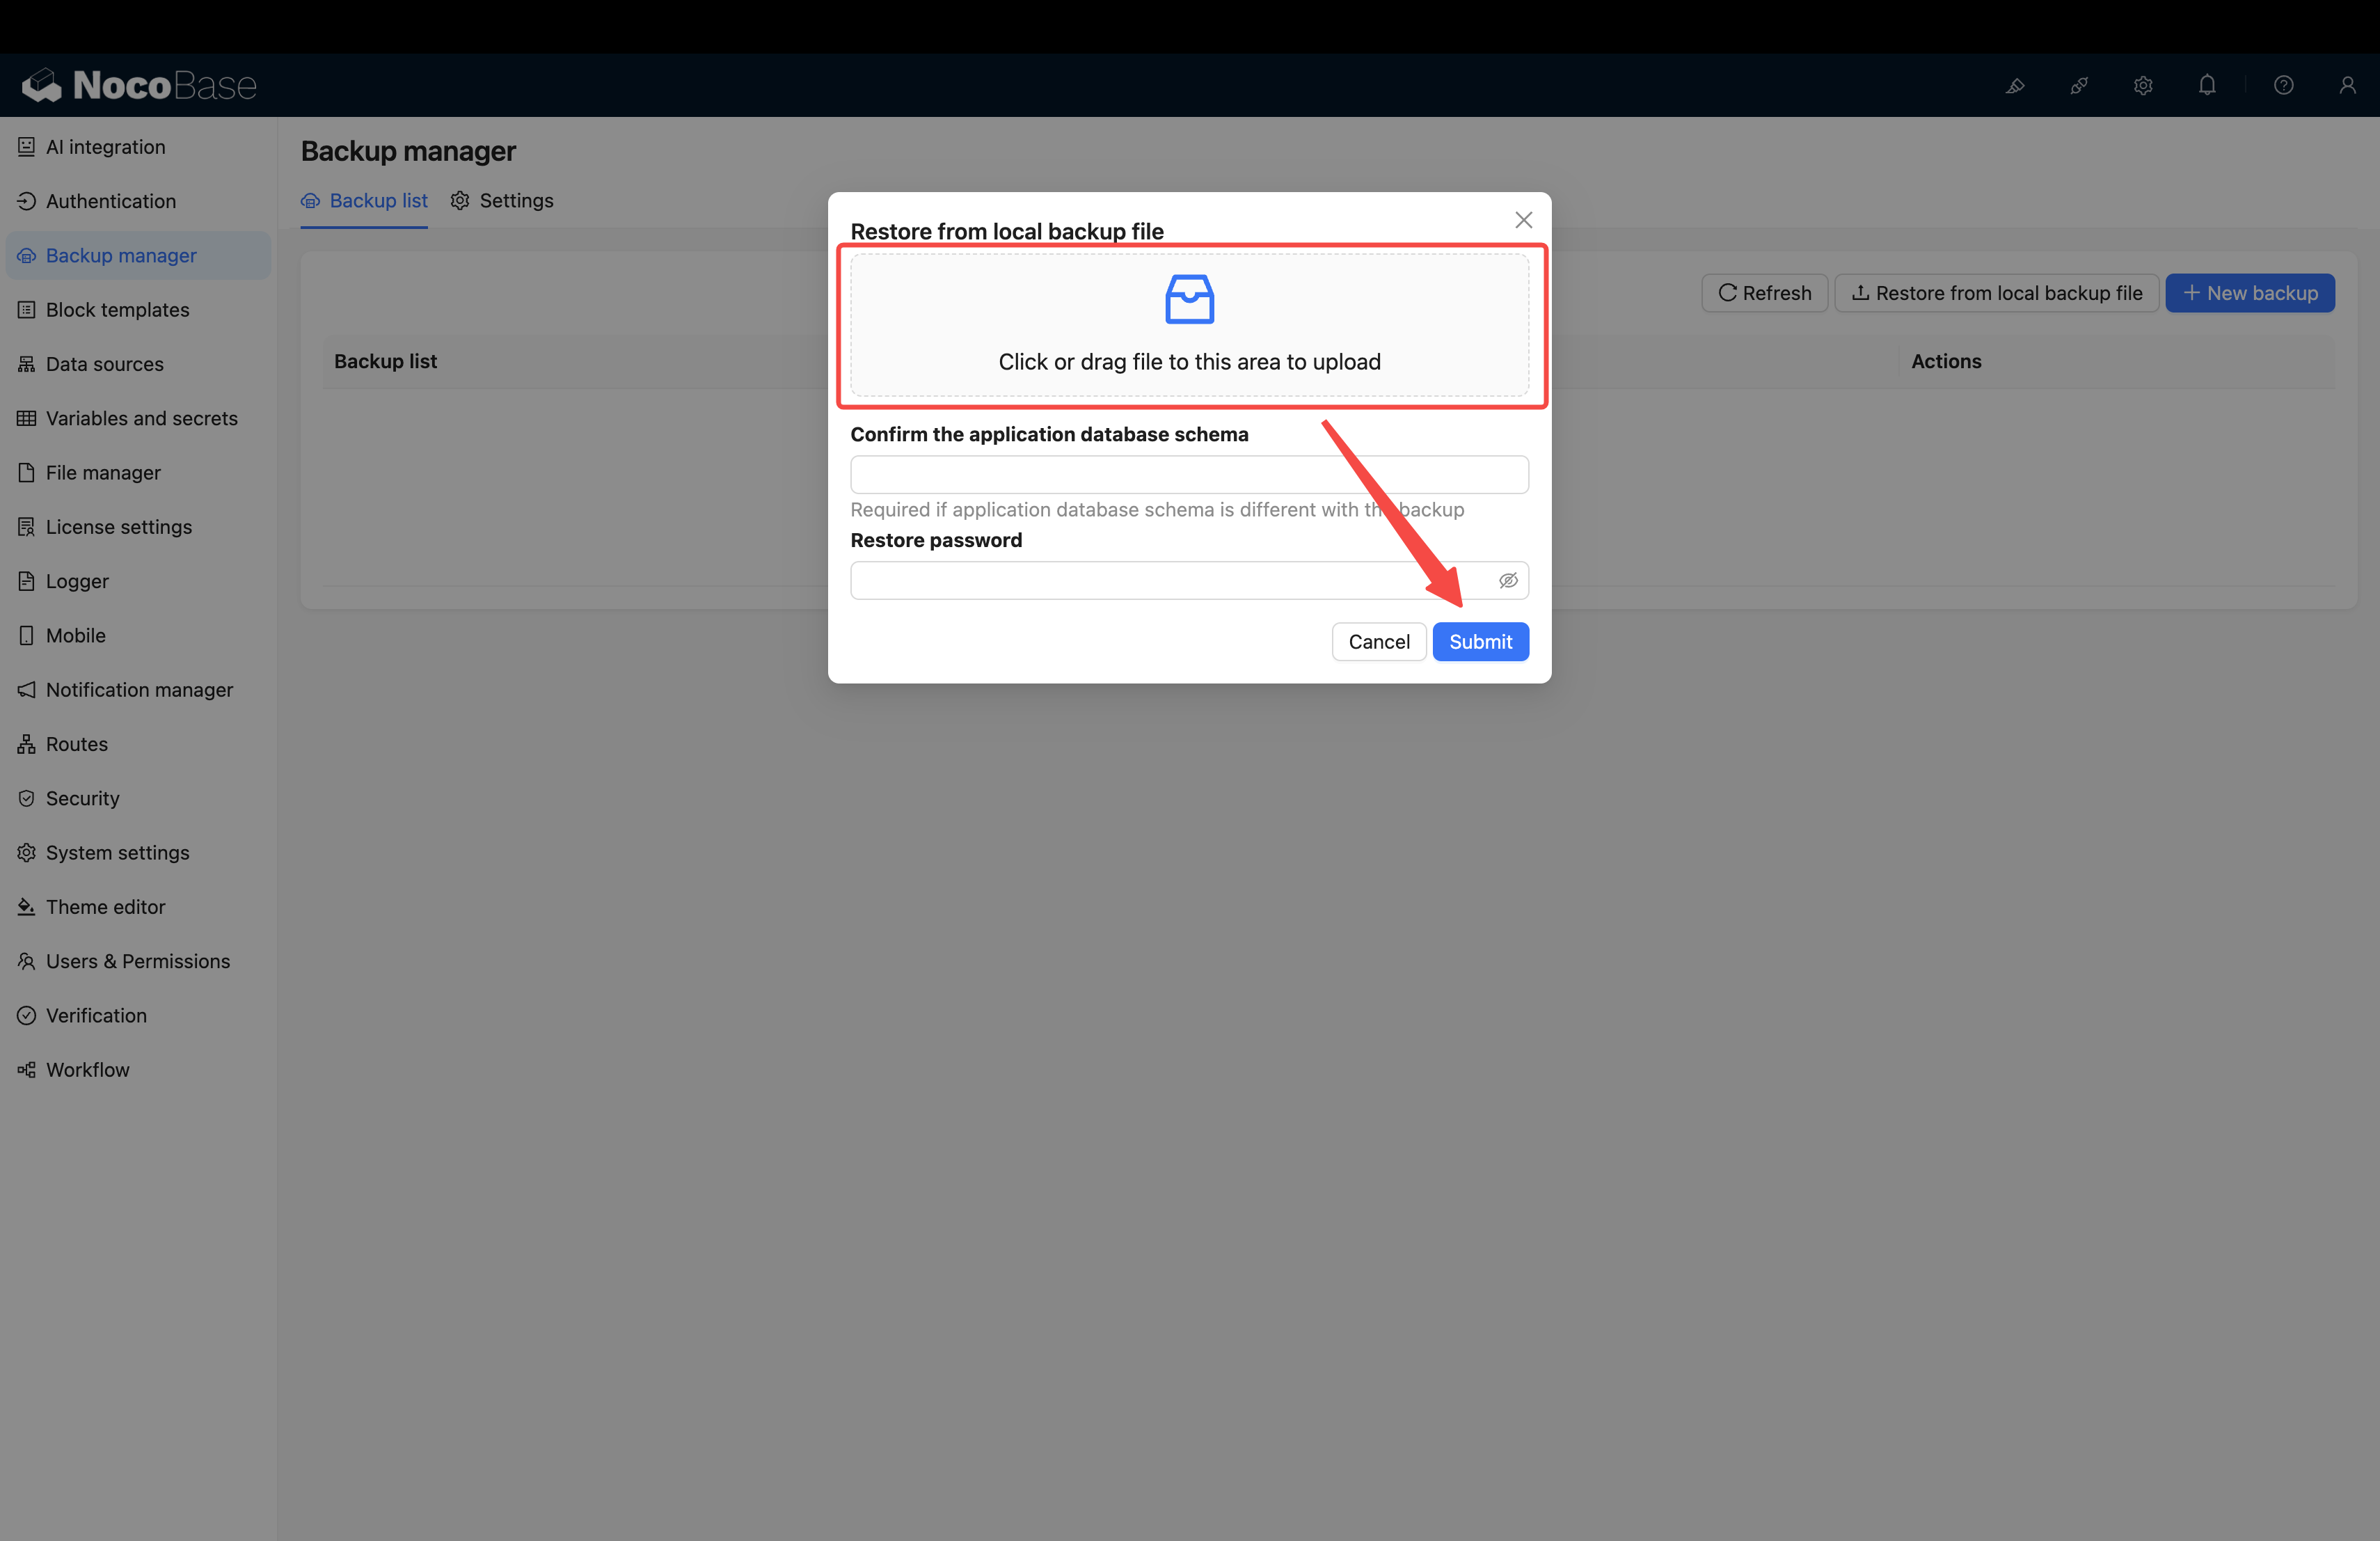
- Drag the Demo backup file we provided (usually in
.zipformat) to the upload area. - Click
Submitand wait patiently for the system to complete restoration, which may take anywhere from tens of seconds to several minutes.
⚠️ Important Notes
- Database Compatibility: This is the most critical point of this method. Your PostgreSQL database version, character set, case sensitivity settings must match the Demo backup source file. Particularly,
schemanames must be consistent. - Commercial Plugin Matching: Please ensure you have and have enabled all commercial plugins required by the Demo, otherwise restoration will be interrupted.
Method 2: Direct SQL File Import (Universal, More Suitable for Community Edition)
This method restores data by directly operating the database, bypassing the “Backup Manager” plugin, thus having no Pro/Enterprise plugin limitations.
Key Features
- Advantages:
- No Version Restrictions: Suitable for all NocoBase users, including community edition.
- High Compatibility: Does not depend on in-app
dumptools, only requires database connection capability. - High Fault Tolerance: If the Demo contains commercial plugins you don’t have (such as ECharts charts), related functions will not be enabled, but won’t affect normal use of other functions, and the application can start successfully.
- Limitations:
- Database Operation Skills Required: Requires users to have basic database operation capabilities, such as how to execute a
.sqlfile. - ⚠️ System File Loss: This method will lose all system files, including template print files, uploaded files in table file fields, etc. This means:
- Print template functions may not work properly
- Uploaded images, documents, and other files will be lost
- Functions involving file fields will be affected
- Database Operation Skills Required: Requires users to have basic database operation capabilities, such as how to execute a
Operation Steps
Step 1: Prepare a Clean Database
Prepare a brand new, empty database for the Demo data you’re about to import.
Step 2: Import the .sql File into the Database
Get the Demo database file we provided (usually in .sql format) and import its contents into the database you prepared in the previous step. There are multiple execution methods, depending on your environment:
-
Option A: Through Server Command Line (Docker Example) If you installed NocoBase and database using Docker, you can upload the
.sqlfile to the server, then usedocker execcommand to perform the import. Assuming your PostgreSQL container name ismy-nocobase-dband the file name iscrm_demo.sql:# Copy sql file into the container docker cp crm_demo.sql my-nocobase-db:/tmp/ # Enter container to execute import command docker exec -it my-nocobase-db psql -U your_username -d your_database_name -f /tmp/crm_demo.sql -
Option B: Through Remote Database Client If your database exposes a port, you can use any graphical database client (such as DBeaver, Navicat, pgAdmin, etc.) to connect to the database, create a new query window, paste the entire contents of the
.sqlfile, and execute it.
Step 3: Connect Database and Start Application
Configure your NocoBase startup parameters (such as environment variables DB_HOST, DB_PORT, DB_DATABASE, DB_USER, DB_PASSWORD, etc.) to point to the database you just imported data into. Then, start the NocoBase service normally.

⚠️ Important Notes
- Database Permissions: This method requires you to have an account and password that can directly operate the database.
- Plugin Status: After successful import, commercial plugin data in the system exists, but if you haven’t installed and enabled corresponding plugins locally, related functions (such as Echarts charts, specific fields, etc.) will not display and work, but this won’t cause application crashes.
Summary and Comparison
| Feature | Method 1: Backup Manager | Method 2: Direct SQL Import |
|---|---|---|
| Applicable Users | Pro/Enterprise Edition users | All users (including Community Edition) |
| Operation Simplicity | ⭐⭐⭐⭐⭐ (Very easy, UI-based operation) | ⭐⭐⭐ (Requires basic database knowledge) |
| Environment Needs | Strict: Database, system version, etc. must be highly compatible | General: Only requires database compatibility |
| Plugin Dependency | Strong dependency: Restoration will fail if any required plugin is missing | Depends on plugins. Data can be imported independently, and the system has basic functionality. However, if the corresponding plugin is missing, related features will not be usable at all. |
| System Files | ✅ Fully preserved (print templates, uploaded files, etc.) | ❌ Will be lost (print templates, uploaded files, etc.) |
| Recommended Scenarios | Pro/Enterprise users with controllable, consistent environments, requiring complete functionality demonstration | Missing some plugins, pursuing high compatibility and flexibility, non-Pro/Enterprise users, acceptable file function loss |
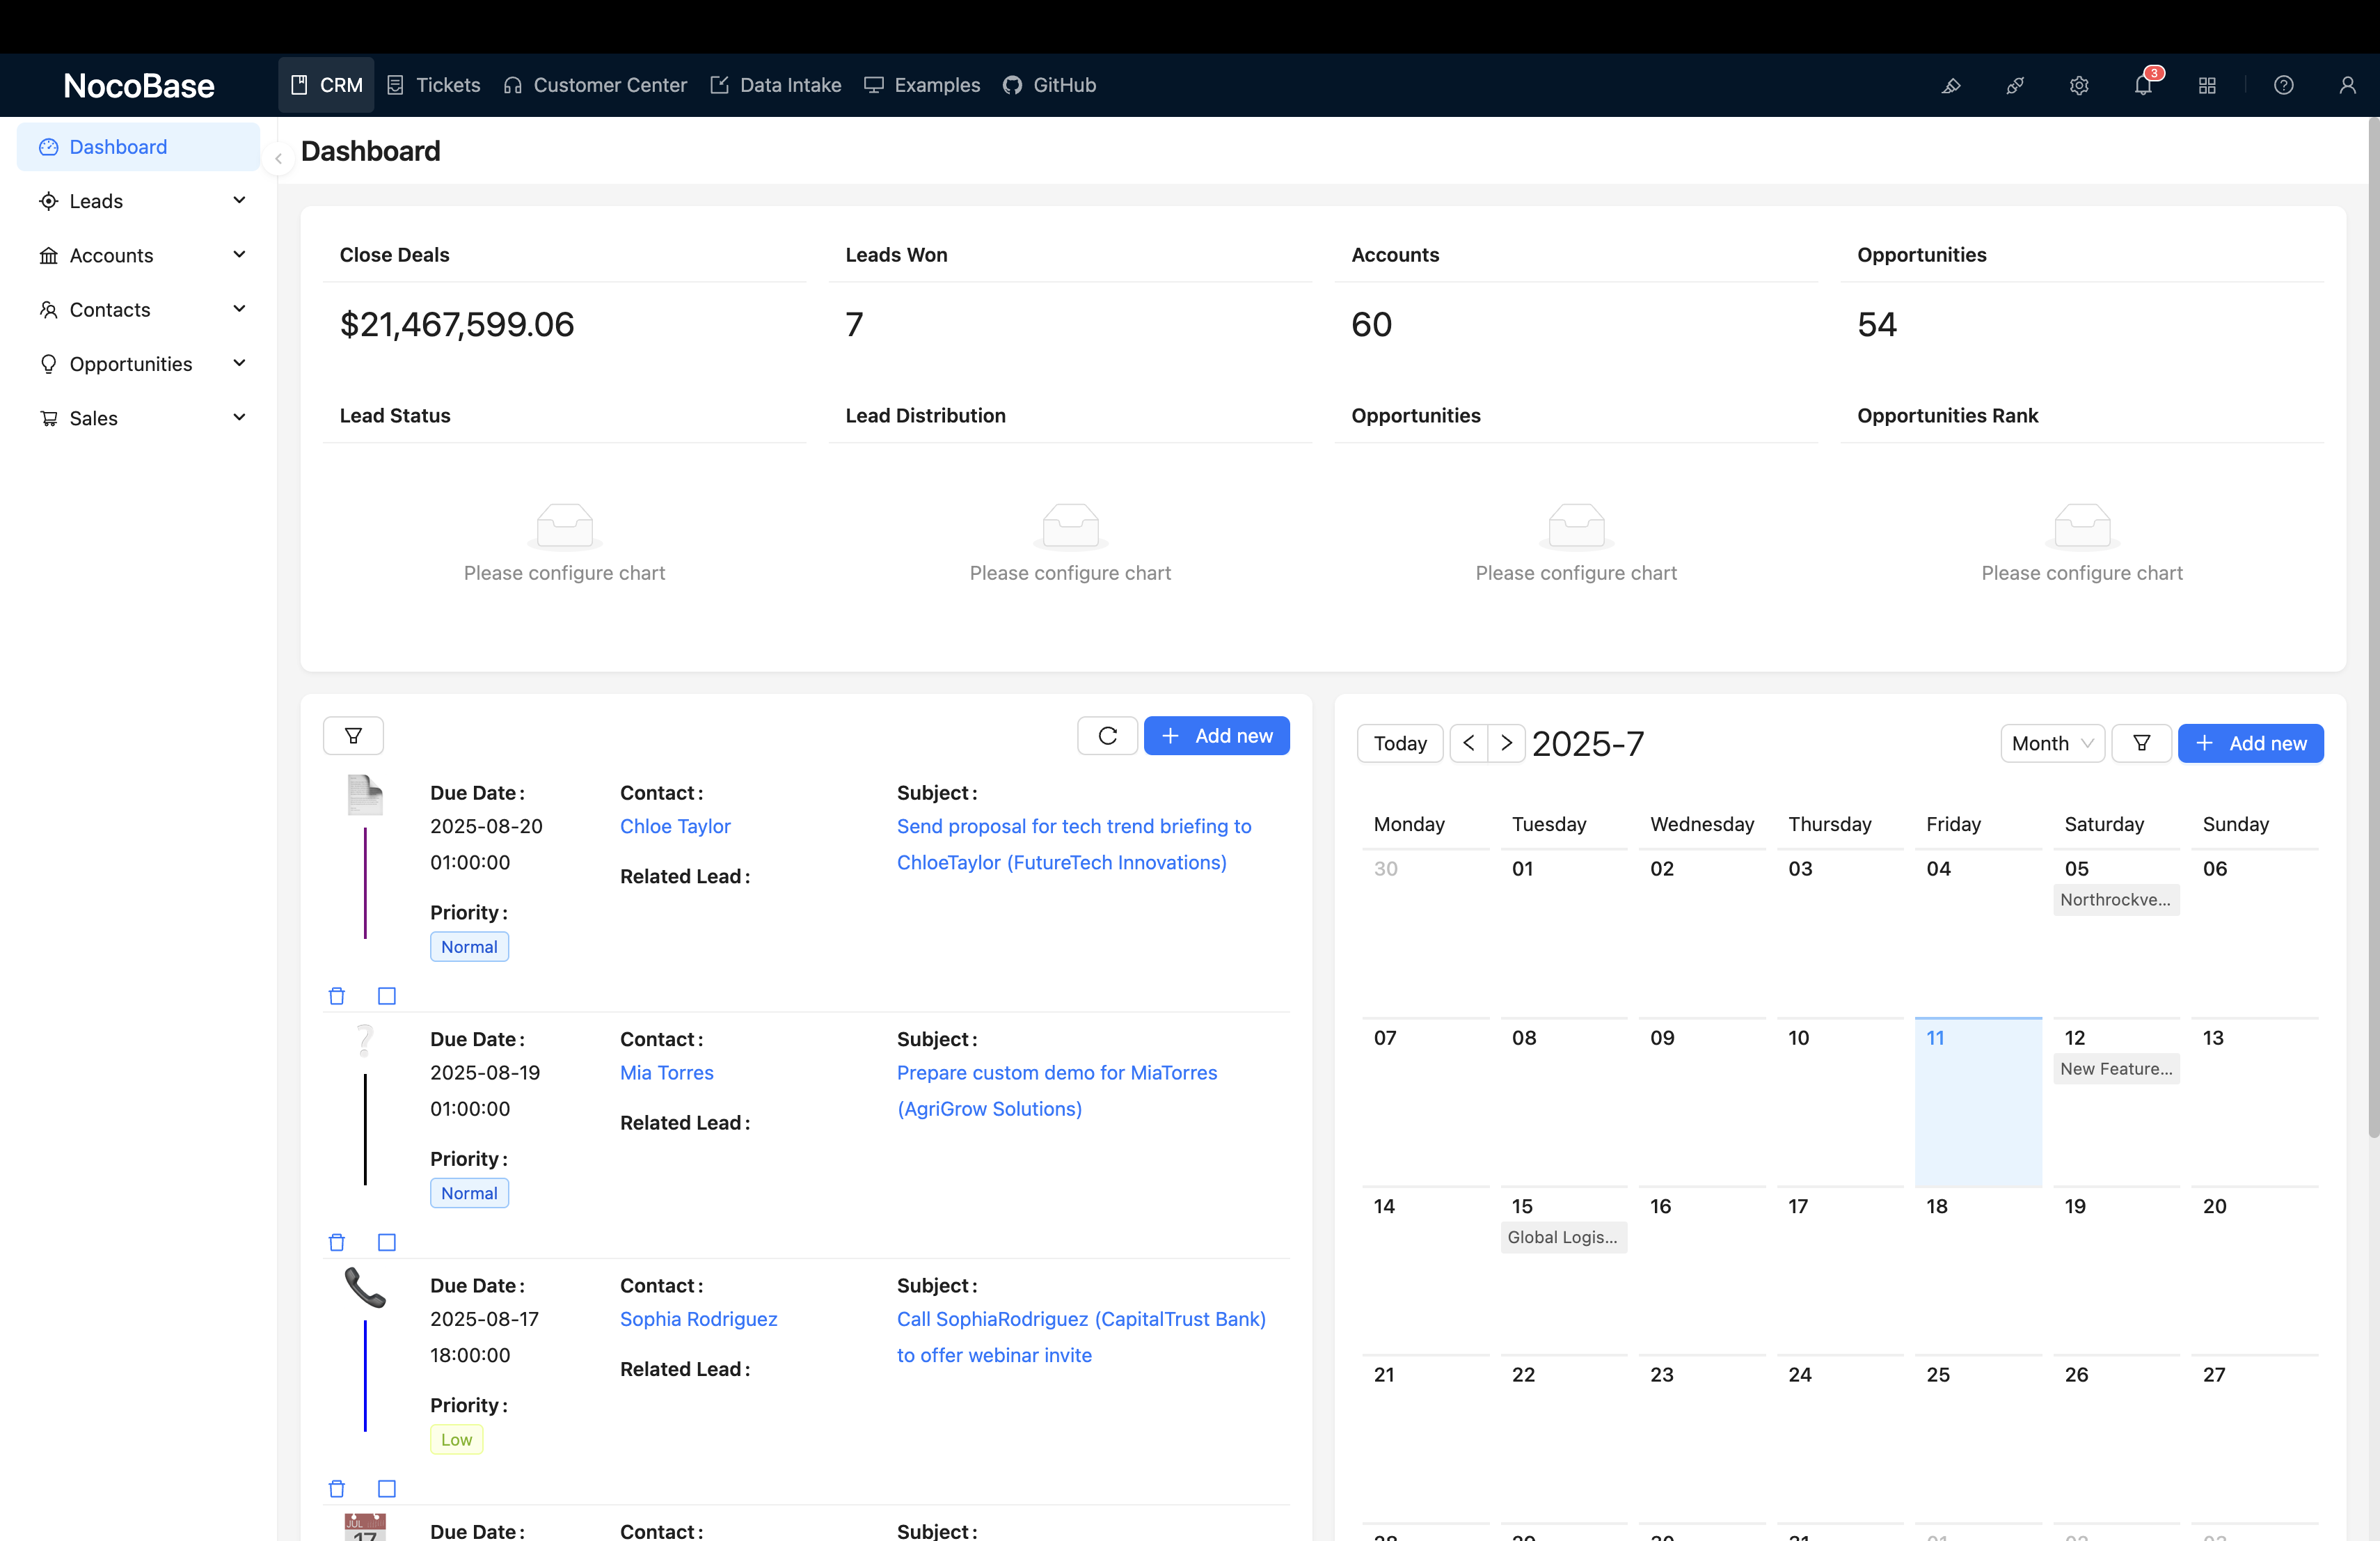
We hope this tutorial helps you successfully deploy the CRM Demo. If you encounter any problems during the operation, please feel free to contact us!